转载请注明出处,本文仅用于学习交流,不对之处,恳请指正
部分图片摘取网络,如有侵权请联系

官方Github仓库: https://github.com/fail2ban/fail2ban
1. 需求
脚本小子太可恶,加上我使用的是frp进行内网穿透的方式对家庭服务器进行整理,太多的攻击连接导致服务器不稳定的急剧增加,以前是通过手写脚本来手动拉黑,后面使用过程中,发现了不稳定性的bug,既然如此就不重复造轮子,直接使用Fail2ban来拉黑暴力破解SSH的IP
2. 环境
我列出了主流使用的Linux系统的安装配置方式,但是实际测试环境为Debian11
3. 安装iptables
如果你的系统中没有安装firewall,ufw,iptables,则需要手动安装iptables
3.1 Debian安装iptables
sudo apt-get update && apt-get install iptables -y3.2 CentOS安装iptables
sudo yum install epel-release -y
sudo yum install iptables -y
3.3 OpenEuler安装iptables
sudo yum install iptables -y3.4 查看iptables规则
iptables -L默认安装后,iptables理论上是空的
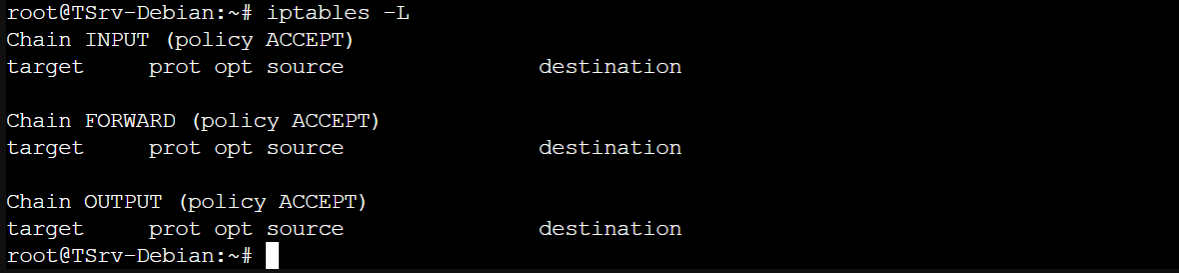
我们可以根据需求自行配置,这里就不展开讨论了,值得注意的是,iptables直接运行命令是没有持久化保存的,Debian一般推荐使用ufw防火墙,CentOS/OpenEuler推荐使用firewalld。
4. 安装Fail2ban
4.1 Debian安装Fail2ban
sudo apt-get update && apt-get install fail2ban -y4.2 CentOS安装Fail2ban
sudo yum install epel-release -y
sudo yum install fail2ban -y
4.3 OpenEuler安装Fail2ban
sudo yum install fail2ban -y4.4 启用
- 启用
sudo systemctl enable --now fail2ban- 查看状态
sudo systemctl status fail2ban5. 配置Fail2ban
nano /etc/fail2ban/jail.local5.1 修改配置
太多参数了,暂时没有时间一个个列出
[DEFAULT]
# 以空格分隔的列表,可以是 IP 地址、CIDR 前缀或者 DNS 主机名
# 用于指定哪些地址可以忽略 fail2ban 防御
# ignoreip = 127.0.0.1 10.0.0.0/8 192.168.0.0/24

### 防火墙
# 注意我并没有进行完整的测试,因为大多防火墙基于iptables,所以我的使用是默认的iptables的方式,仅仅查询相关资料并列出,如果有误请指出
#
# Debian一般使用ufw
# banaction ufw
# banaction_allports = ufw
#
# CentOS,OpenEluer一般使用firewalld
# banaction = firewallcmd-rich-rules[actiontype=<multiport>]
# banaction_allports = firewallcmd-rich-rules[actiontype=<allports>]
#
# 使用nftables
# banaction = nftables-multiport
# banaction_allports = nftables-allports
#
# 使用iptables
# banaction = iptables-multiport
# banaction_allports = iptables-allports

### 客户端主机被禁止的时长(秒)
bantime = 86400

### 客户端主机被禁止前允许失败的次数
maxretry = 6

### 查找失败次数的时长(秒)
findtime = 600

### 发送邮件程序
# 使用sendmail方案
# mta = sendmail
# 使用Postfix方案
# mta = postfix

### 启用SSH监听,或者使用下方的[ssh-iptables]
[sshd]
enable=true

### 启用ssh-iptables监听
# [ssh-iptables]
# enabled = true
# filter = sshd
# action = iptables[name=SSH, port=ssh, protocol=tcp]
# sendmail-whois[name=SSH, dest=your@email.com, sender=fail2ban@email.com]
# Debian 系的发行版
# logpath = /var/log/auth.log
# Red Hat 系的发行版
# logpath = /var/log/secure
# ssh 服务的最大尝试次数
# maxretry = 3
5.2 验证fail2ban是否正确运行
- 验证fail2ban是否成功运行
sudo fail2ban-client ping需返回
Server replied: pong- 验证fail2ban是否正常工作
sudo tail -f /var/log/fail2ban.log使用SSH Client进行连接,并不断输入错误密码
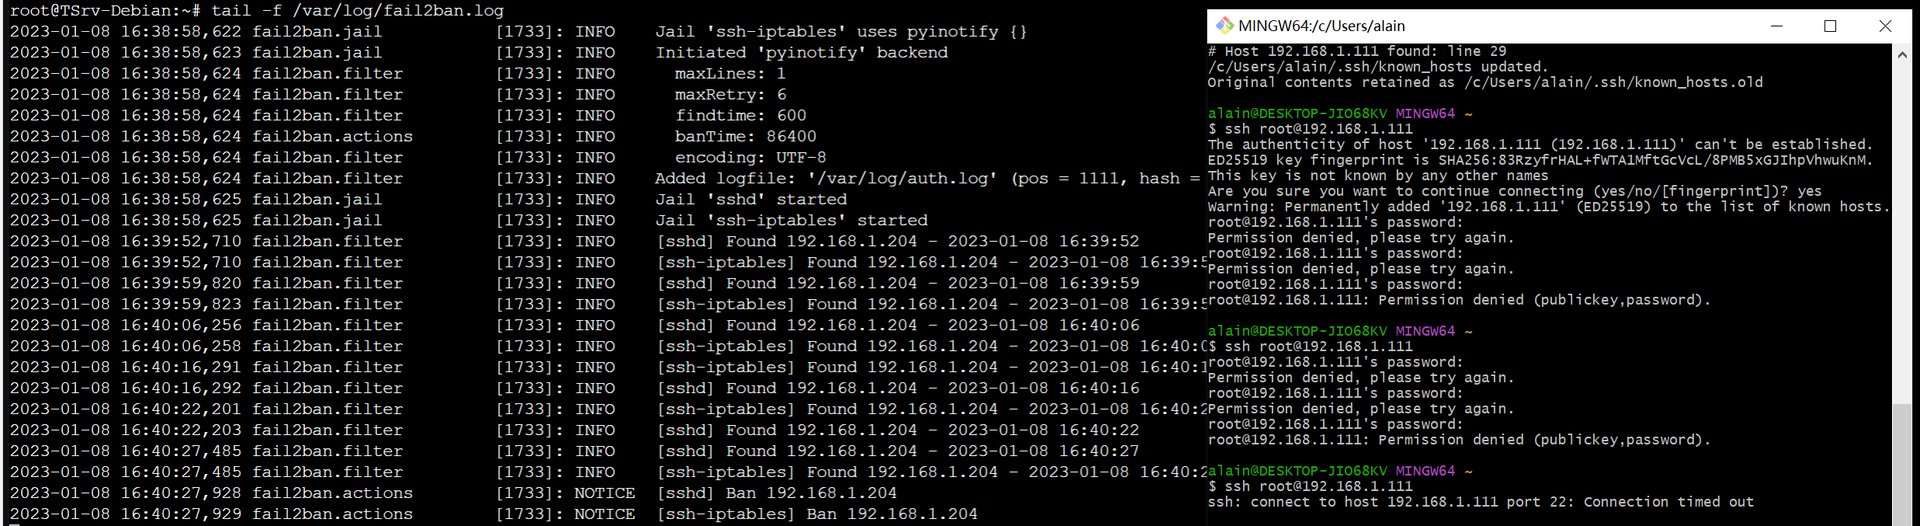
正常情况下,每次错误都会被准确的捕获到
- 列出 iptables
因为我使用的是iptables,如果你使用的是ufw, firewalld等,请使用相关命令进行测试
sudo iptables --list -n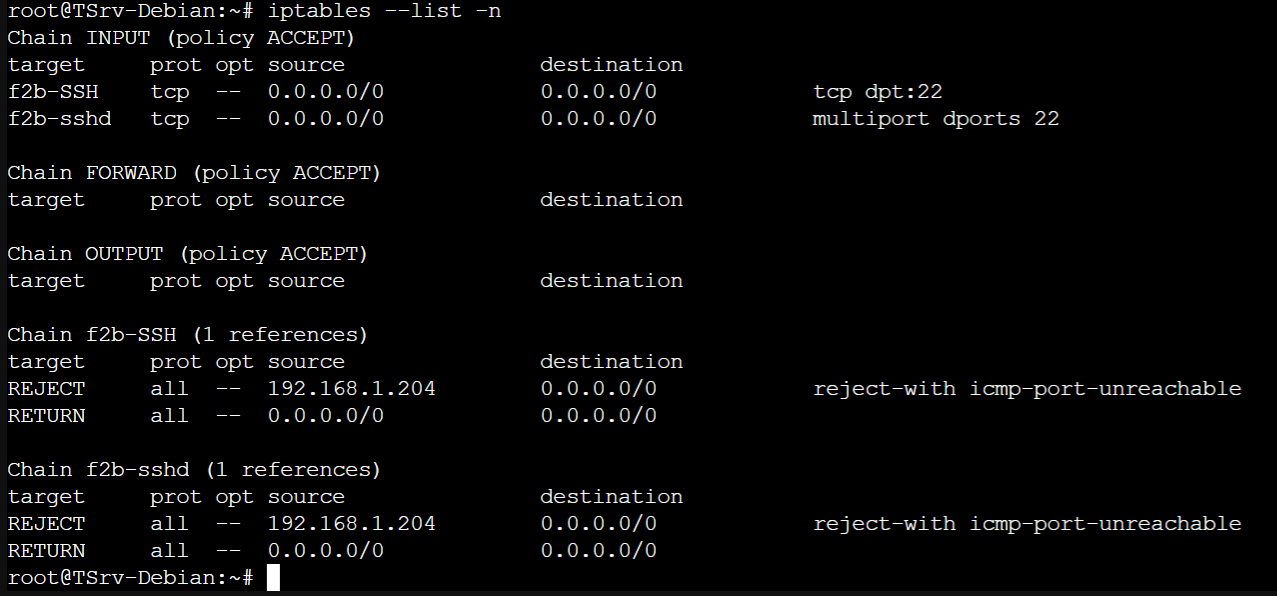
- 解锁IP
sudo fail2ban-client set sshd unbanip 192.168.1.204
文章评论